


On the subject of boosting your car’s efficiency, typically the best upgrades make the most important distinction. Enter the chilly air consumption—a well-liked modification that invitations cooler, denser air into your engine, serving to it breathe simpler and run extra effectively. But when the considered diving underneath your hood feels daunting, concern not. On this information, “,” we’ll stroll you thru every stage of the set up course of with clear, simple directions. Whether or not you’re a seasoned gearhead or a curious first-timer, this text will provide help to remodel your trip’s consumption system with confidence and ease. Able to let your engine inhale contemporary, invigorating air? Let’s get began.
Desk of Contents
- Selecting the Proper Chilly Air Consumption for Optimum Efficiency
- Getting ready Your Automobile for a Seamless Set up Expertise
- Step-by-Step Set up Course of with Knowledgeable Ideas
- Put up-Set up Checks and Upkeep for Lasting Effectivity
- Concluding Remarks
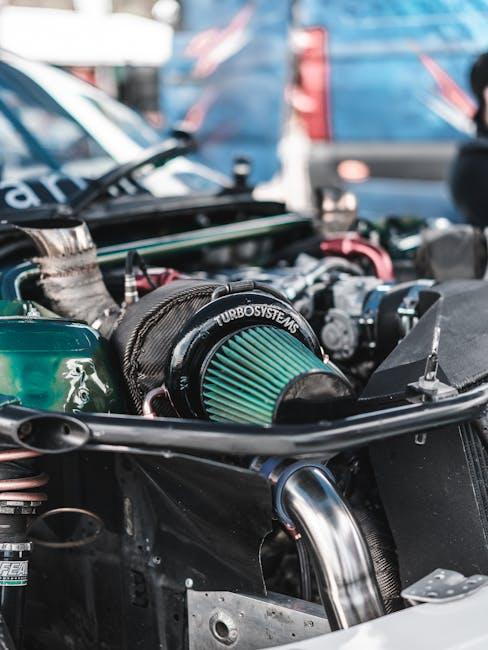
Selecting the Proper Chilly Air Consumption for Optimum Efficiency
Choosing a chilly air consumption that enhances your car’s engine and driving fashion is vital to unlocking most efficiency. Take into account components reminiscent of compatibility along with your automotive mannequin, the materials of the consumption system, and airflow effectivity when making your alternative. Methods created from high-quality supplies like aluminum or carbon fiber provide sturdiness and warmth resistance, which ensures cooler air reaches your engine. Equally vital is the design; a well-engineered consumption will cut back air turbulence and enhance the quantity of air obtainable for combustion, delivering noticeable energy and throttle response enhancements.
To simplify your choice, consider these essential issues earlier than shopping for:
- Fitment: Confirm the consumption system matches your make and mannequin.
- Filter Kind: Go for reusable filters for long-term financial savings or disposable ones for ease of upkeep.
- Set up: Select a equipment with clear directions and included {hardware} for a hassle-free setup.
- Noise Ranges: Steadiness efficiency beneficial properties with sound tolerance in response to private desire.
| Materials | Advantages | Typical Value |
|---|---|---|
| Excessive-Density Plastic | Light-weight & cost-efficient | $100 – $200 |
| Aluminum | Sturdy & warmth resistant | $150 – $300 |
| Carbon Fiber | Premium power & aesthetics | $300 – $600 |

Getting ready Your Automobile for a Seamless Set up Expertise
Earlier than diving into your chilly air consumption set up, be sure your workspace is clear and well-lit. Having a clutter-free space with ample lighting will cut back the probabilities of dropping small elements or misaligning parts throughout the course of. Collect all needed instruments—assume ratchets, screwdrivers, pliers, and maybe even a torque wrench—to keep away from last-minute journeys to the ironmongery store. It’s a wise transfer to seek advice from your car’s handbook for any particular notes on eradicating manufacturing unit elements or dealing with delicate sensors safely. Preparation is vital, saving you from frustration whenever you’re midway via the set up.
Subsequent, it’s time to safe your car in place. Have interaction the parking brake and, if potential, use wheel chocks to make sure the automotive will not shift throughout the set up. Bear in mind to disconnect the damaging battery terminal to stop any electrical mishaps whereas dealing with the consumption’s digital parts. To maintain observe of your progress and elements, take into account establishing an organized structure with labeled containers or trays for bolts, nuts, and clamps. This small step can save hours of head-scratching in a while. Your car and instruments prepared? You’re already one step nearer to that clear, clean airflow your engine craves.

Step-by-Step Set up Course of with Knowledgeable Ideas
Start by gathering all needed instruments and parts earlier than diving into the set up. This preparation not solely streamlines the method but additionally helps keep away from sudden delays. Ensure your engine is cool, then gently disconnect the damaging battery terminal to stop any electrical mishaps. Subsequent, fastidiously take away the inventory air consumption system, paying attention to hose clamps and sensor attachments. Preserve these elements organized—they could turn out to be useful later or throughout common upkeep checks. When positioning the brand new chilly air consumption, make sure the tubing routes away from engine warmth sources to maximise efficiency beneficial properties and keep cool air consumption temperatures.
As you safe the brand new parts, do not rush tightening screws or clamps. Over-tightening can injury delicate elements or create air leaks, undermining the system’s effectivity. To assist you on this course of, take into account this fast reference for torque settings:
| Part | Torque Setting | Tip |
|---|---|---|
| Hose Clamps | 15-20 in-lbs | Cosy however versatile |
| Bolts | 25-30 in-lbs | Use a torque wrench |
| Sensors | Hand-tight | Delicate threads |
- Examine all seals earlier than finalizing to keep away from vacuum leaks.
- Recheck connections after the primary few miles of driving.
- Preserve the filter clear by following the producer’s really useful upkeep schedule.

Put up-Set up Checks and Upkeep for Lasting Effectivity
As soon as your chilly air consumption is securely put in, the actual work begins to maintain it acting at peak effectivity. Begin by conducting a visible inspection to make sure all clamps are tight, and no parts have shifted throughout the first few drives. Examine the air filter for any particles or grime buildup, particularly in case you often drive in dusty or off-road situations. Don’t overlook to pay attention for any uncommon noises that may point out air leaks or free fittings — a clean, regular airflow sound means you’re heading in the right direction.
To keep up optimum operate over time, undertake these easy habits:
- Commonly Clear or Exchange the Filter: Comply with the producer’s tips, normally each 12,000 to fifteen,000 miles.
- Examine the Consumption Tube: Search for cracks or put on that would cut back air high quality or quantity.
- Monitor Efficiency: Control gas financial system and engine responsiveness to catch any delicate modifications early.
| Upkeep Job | Advisable Frequency | Notes |
|---|---|---|
| Air Filter Cleansing | Each 12,000 miles | Use manufacturer-approved cleansing kits |
| Consumption Tube Inspection | Each 6 months | Examine for cracks or free fittings |
| Efficiency Examine | Month-to-month | Observe engine response and gas financial system |
Concluding Remarks
Together with your chilly air consumption now put in, you’ve not solely enhanced your engine’s efficiency but additionally deepened your connection along with your car. This step-by-step journey transforms a easy improve right into a rewarding hands-on expertise, proving that typically, the trail to smoother rides and higher energy is as refreshing because the cool air your engine now breathes. So, take it for a spin, really feel the distinction, and embrace the drive—as a result of each breath counts.
