


Altering your automobile’s oil for the primary time can really feel like getting into uncharted territory. Between the unfamiliar instruments, messy fluids, and technical jargon, the entire course of may appear daunting. However what in case you might remodel this routine upkeep process into an easy, empowering expertise? Welcome to “,” the place we break down every step with readability and ease. Whether or not you’re a curious automobile proprietor or somebody keen to economize and acquire confidence underneath the hood, this information will steer you easily from hesitation to hands-on success. Let’s get your engine—and your expertise—working easily.
Desk of Contents
- Gathering Important Instruments and Supplies for a Clean Oil Change
- Getting ready Your Car and Making certain Security Earlier than You Start
- Step-by-Step Information to Draining Outdated Oil and Altering the Filter
- Selecting the Proper Oil and Correctly Refilling Your Engine
- The Conclusion

Gathering Important Instruments and Supplies for a Clean Oil Change
Earlier than you roll up your sleeves, make certain to have all the required objects available to keep away from interruptions throughout your oil change. Important instruments embrace a sturdy jack and jack stands to soundly carry your automobile, the right dimension wrench or socket on your drain plug, and an oil filter wrench for eradicating the previous filter with ease. Remember a drain pan to catch the previous oil, funnel for clear pouring, and a few thick gloves to guard your palms from sizzling, soiled oil. Holding just a few previous rags close by can also be a sensible transfer for fast cleanups.
Equally essential are the supplies that can preserve your engine purring easily after the oil change. Select the proper grade and sort of oil really useful by your automobile’s producer and a brand-new oil filter that matches your automobile’s specs. To your reference, right here’s a fast information to generally used oil grades and their typical use circumstances:
| Oil Grade | Widespread Use | Viscosity |
|---|---|---|
| 5W-30 | Most fashionable gasoline engines | Low temperature move, average thickness |
| 10W-40 | Older engines, hotter climates | Increased movie power, thicker oil |
| 0W-20 | Gasoline-efficient newer fashions | Glorious chilly begin efficiency |
| 15W-40 | Diesel engines, heavy-duty autos | Heavy viscosity at excessive temps |

Getting ready Your Car and Making certain Security Earlier than You Start
Earlier than diving into the hands-on a part of altering your oil, it is essential to get your automobile prepared and prioritize security to maintain all the pieces working easily. Start by making certain your automobile is parked on a degree floor—this not solely stabilizes the automobile but in addition helps with correct oil drainage. Interact the parking brake and, if attainable, use wheel chocks to stop any sudden rolling. Let the engine calm down for at the least half-hour to keep away from burns from sizzling oil or engine components, and collect all mandatory instruments inside straightforward attain to make the method environment friendly.
Security doesn’t cease at preparation; sporting acceptable gear is simply as essential. Equip your self with mechanic gloves to guard your palms from grime and attainable cuts, and don security glasses to protect your eyes from splashes. Have a sturdy container prepared for the previous oil and preserve absorbent supplies close by in case of spills—these small steps forestall accidents and environmental hurt. Beneath is a fast guidelines that may provide help to keep organized as you put together:
- Automobile Degree Floor – Ensures stability and correct drainage
- Parking Brake & Wheel Chocks – Prevents automobile motion
- Engine Cool-Down – Protects from burns
- Protecting Gloves & Glasses – Security from accidents and splashes
- Oil Drain Pan & Absorbents – For clear, spill-free oil extraction
- Instruments Prepared – Wrenches, filter wrench, funnel, and new oil

Step-by-Step Information to Draining Outdated Oil and Altering the Filter
Start by warming up your engine for a couple of minutes; this helps the oil drain extra easily. Park your automobile on a degree floor and safe it utilizing wheel chocks for security. Subsequent, place a drainage pan beneath the oil drain plug. Utilizing the right dimension wrench, rigorously unscrew the drain plug counterclockwise. Be ready for the oil to move out shortly—put on gloves and keep away from direct contact. Enable all of the previous oil to completely drain, which may take a number of minutes. As soon as empty, wipe the drain plug clear and exchange its washer if wanted, then screw it again in firmly however keep away from over-tightening to stop injury.
Transferring on to the filter, find the oil filter which frequently resembles a small canister screwed onto the engine block. Use an oil filter wrench to loosen and take away the previous filter, maintaining your drainage pan beneath to catch any residual oil. Earlier than putting in the brand new filter, apply a small quantity of recent oil to the rubber gasket—this ensures a decent seal and prevents leaks. Screw the brand new filter in place by hand, turning it clockwise till cosy, then give it an additional quarter flip. Double verify that the drain plug is safe earlier than refilling the engine with the really useful quantity and sort of latest oil.
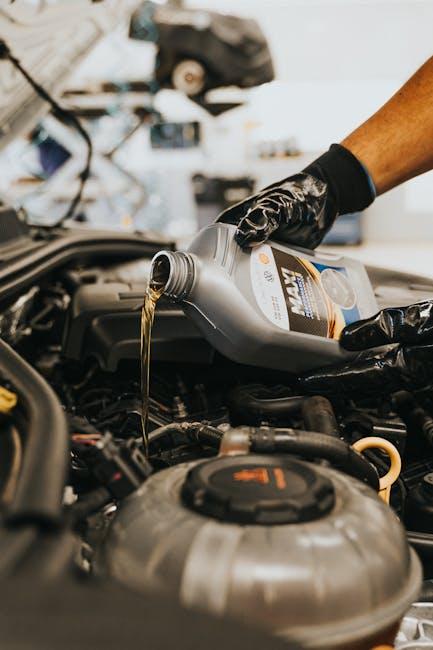
Selecting the Proper Oil and Correctly Refilling Your Engine
Choosing the proper oil is greater than only a informal choose—it’s about understanding what fuels your engine’s well being and longevity. Begin by consulting your automobile’s handbook to seek out the really useful viscosity grade and oil kind, whether or not artificial or standard. Consider, artificial oils usually supply higher efficiency in excessive temperatures and longer intervals between modifications. Elements like driving situations—metropolis stop-and-go visitors versus freeway cruising—additionally affect oil alternative. While you select the proper oil, you’re primarily matchmaking your engine’s wants with the fluid that retains it working easily and effectively.
Correctly refilling your engine with oil requires precision and care. Earlier than pouring, make sure you’ve used a clear funnel to keep away from contamination. Pour slowly, pausing periodically to verify the dipstick, so that you don’t overfill—an excessive amount of oil may be simply as dangerous as too little. Use this helpful information beneath to shortly verify your oil ranges in accordance with your dipstick readings:
| Dipstick Mark | Oil Degree | Motion Wanted |
|---|---|---|
| Full | Excellent | No motion required |
| Between Low & Full | Acceptable | Monitor usually |
| Low | Wants topping up | Add oil rigorously |
| Beneath Low | Crucial | Refill instantly |
- Use a funnel to stop spills and contamination.
- Test the extent a number of instances through the refill course of.
- Exchange the oil cap securely to keep away from leaks and keep engine stress.
The Conclusion
Embarking in your first DIY oil change is greater than only a upkeep process—it’s a small however significant step towards automotive confidence and self-reliance. With the fundamentals now underneath your belt, what may need appeared daunting earlier than turns into an easy, even empowering, routine. Keep in mind, each skilled was as soon as a newbie who took that first flip with endurance and care. So roll up your sleeves, belief the method, and benefit from the satisfaction that comes from mastering your individual automobile’s care—one oil change at a time.
